Steering & Suspension Joint Sourcing Guide: Tie Rod Ends, Rack Ends & Ball Joints
A steering part can look correct in a photo and still be wrong on the vehicle. A slightly different thread, an incorrect stud taper, or a rack-side connection made for another steering gear can turn a routine purchase into returns, rework, and lost sales - especially when the same error is repeated across a volume order.
Tie rod ends, rack ends, and ball joints are often grouped together because they use a ball-and-socket style joint and may appear similar at first glance. Their functions, mounting locations, and critical dimensions are not the same. The safest approach is to combine the OE number with vehicle information, dimensional confirmation, and a clear quality specification. Here is what purchasing teams should verify before approving a quotation or pro forma invoice.
OE NUMBER + VEHICLE DATA + DIMENSIONS + QUALITY SPECIFICATION |
1. Identify the Part Before Comparing Prices
Tie Rod End
A tie rod end is normally installed at the outer end of the steering linkage. Its ball stud connects to the steering knuckle, while the threaded body connects to the inner tie rod or adjusting sleeve. It transfers steering movement to the wheel and allows the joint to articulate as the suspension moves. Common purchasing errors include ordering the wrong side, choosing the wrong male or female thread, or accepting a stud taper that looks similar but does not seat correctly.
Rack End / Inner Tie Rod
A rack end, also called an inner tie rod in many markets, connects the steering rack to the outer tie rod end. Depending on the steering system, the rack-side end may use a threaded ball housing, a special washer, a locking plate, or another retention design. Two rack ends can have nearly the same overall length but different rack-side threads, housing diameters, wrench flats, or travel characteristics. A visual match alone is not enough.
Ball Joint
A ball joint connects the control arm and steering knuckle, allowing the suspension to move while the wheel changes steering angle. It may be pressed into a control arm, bolted to it, or supplied as part of a complete arm assembly. Some designs carry vehicle load, while others mainly guide suspension movement. The mounting pattern, press-fit diameter, stud taper, stud direction, and boot profile must all match the intended application.
The key point is simple: these three parts may share a similar joint concept, but they are not interchangeable. A buyer should first confirm what the part does and where it is installed before comparing price, packaging, or delivery time.
Quick comparison
Part | Typical location | Main function | Common ordering risks |
|---|---|---|---|
Tie Rod End | Outer steering linkage | Transfers steering movement to the knuckle | Side, male/female thread, stud taper, bend or offset |
Rack End / Inner Tie Rod | Between steering rack and outer tie rod | Connects the rack to the outer joint | Rack-side thread, functional length, housing and locking method |
Ball Joint | Control arm to steering knuckle | Allows suspension pivot and steering articulation | Press-fit or bolt pattern, stud direction, taper and design type |
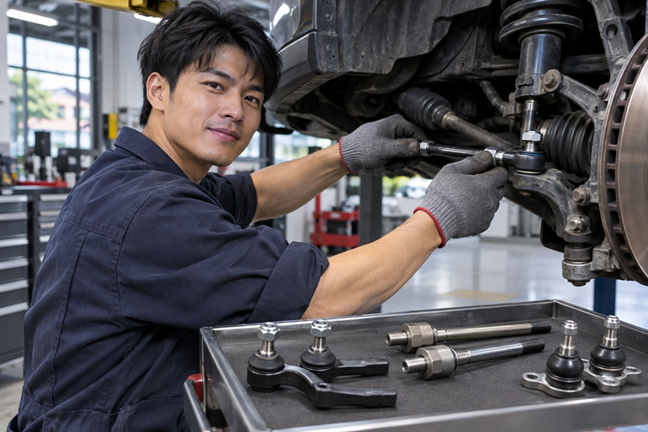
Installation context matters: tie rod ends, rack ends and ball joints work in different locations and cannot be selected by appearance alone. |
2. Do Not Rely on the OE Number Alone
The OE number is the best starting point, but it should not be the only reference. Numbers may be superseded, formatted differently by region, or cross-referenced to multiple vehicle configurations. In some catalogues, one number may cover a production range with important notes that are easily missed.
Always provide as much of the following information as possible:
Vehicle make and model
Model year or production date range
Chassis, platform, or frame code
Engine code when relevant
Left-hand drive or right-hand drive
Front or rear axle position
Left, right, upper, or lower position
Steering rack or suspension supplier, when known
OE number and any alternative numbers
For older vehicles, local-market versions, or models assembled in more than one country, photos and measurements become especially important. A VIN can help, but it may not reveal previous non-original repairs.
3. Confirm the Dimensions That Control Fitment
A professional quotation should be based on more than a product name. Ask the supplier for a drawing, dimensional photo, or measurement sheet and compare the following points.
Confirm thread diameter, pitch, length and stud taper against a drawing or approved sample. |
Thread specification
Check whether each connection is male or female, the major diameter, thread pitch, and thread direction. Left-hand and right-hand threads may be used in the same steering assembly for adjustment. A part can screw in for one or two turns and still be incorrect, so “almost fits” is not acceptable.
Overall and functional length
Confirm how the supplier measures length: total end-to-end length, housing-to-thread length, center-to-center distance, or installed length. Different catalogues may use different reference points. For rack ends, even a small difference can reduce the available toe-adjustment range.
Ball stud and taper
Verify the stud thread, stud length, taper angle or taper diameters, and the position of the cotter-pin hole when used. The taper must seat correctly in the steering knuckle or control arm. Tightening a mismatched taper does not make it correct and may damage the mating component.
Housing and mounting dimensions
For ball joints, confirm the press-fit diameter, flange diameter, bolt-hole quantity, hole spacing, and orientation. For tie rod ends, check body shape, bend angle, offset, and wrench area. For rack ends, check the rack-side housing diameter, wrench flats, locking method, and clearance around the boot.
Supplied hardware
Clarify whether the part includes the nut, castle nut, cotter pin, grease fitting, washer, clamp, locking plate, or boot accessories. Missing hardware may delay installation or force the customer to reuse worn components.
4. Check Side, Steering Position, and Vehicle Configuration
“LH” and “RH” can describe the side of the vehicle, the direction of the thread, or the viewing direction used by a particular catalogue. Never assume that two mirrored-looking parts form a correct pair. Ask the supplier to state the vehicle side clearly and verify the OE cross-reference for each side.
Left-hand-drive and right-hand-drive vehicles may use different steering racks and therefore different rack ends or tie rod ends. Even when the outer joint looks unchanged, the inner connection, length, or bend may differ. Suspension packages, four-wheel-drive systems, and production changes can also affect fitment.
For mixed orders, keep the application data attached to each line item. A spreadsheet should not contain only the part number and quantity. Add columns for vehicle, year, position, side, steering type, and remarks. This reduces confusion when quotations are revised or repeat orders are reviewed later.
5. Quality Is More Than a Clean Surface
A polished housing and a fresh black coating may look attractive, but appearance does not confirm internal quality. Steering and suspension joints operate under repeated movement, impact, contamination, and changing loads. Ask how the supplier controls the areas that matter.
Important questions include:
Is the body forged, cast, or machined, and is the construction suitable for the application?
How are the ball stud material and heat treatment controlled?
Is articulation torque or preload checked for consistency?
Are axial and radial clearances monitored?
How is the stud retained in the housing?
What corrosion protection is applied to exposed metal?
Is the dust boot compatible with grease, heat, ozone, and road contamination?
Is the boot clamped securely without being cut or twisted?
The joint should move smoothly without looseness, binding, or inconsistent resistance, and the boot should seal around both the stud and housing. Grease leakage, damaged sealing lips, rough threads, or an off-center stud are warning signs. For a new supplier or high-volume program, request samples and inspection records first.
Quality review should include material, heat treatment, joint preload, clearance, sealing and corrosion protection. |
6. Use Photos and Samples Correctly
Photos are useful when they show the right details. A single front-view product image is rarely enough. Request multiple angles with a scale or caliper visible. Include close-ups of the threads, stud taper, mounting flange, rack-side connection, boot, markings, and included hardware.
When sending an old sample, preserve its markings, label the vehicle application, and identify the side. Measure from fixed reference points rather than relying on an unknown threaded adjustment position.
For custom or difficult applications, approve a pre-production sample and test it on the intended vehicle before mass production. Record the approved dimensions, performance requirements, finish, packaging, and markings. Verbal confirmation is not enough for repeat orders.
7. Confirm Packaging, Labels, and Order Details
Correct fitment is the first priority, but B2B orders also need consistent commercial details. Confirm the unit packing, quantity per carton, carton dimensions, gross and net weight, country-of-origin marking, barcode, label format, and whether the parts are packed as individual pieces or left/right pairs.
Protect exposed threads, prevent parts from striking each other, and avoid compressing the boots. For mixed-SKU shipments, link each item number to its carton number and quantity so the warehouse can identify goods quickly.
Before approving the PI, review not only unit price but also MOQ, standard packing quantity, lead time, sample status, warranty terms, and any items marked “reference only.” For alternative OE cross-references, ask whether the part is an exact replacement or a catalogue interchange that still requires verification.
8. A Practical Checklist Before Ordering
Before placing an order, confirm these eight items:
01 Exact part category: tie rod end, rack end, or ball joint | 05 Threads, length, stud taper, and mounting dimensions |
02 OE number plus complete vehicle application | 06 Included nuts, pins, washers, fittings, and other hardware |
03 Position and side: LH/RH, upper/lower, front/rear | 07 Sample, photo, or drawing approval for uncertain applications |
04 LHD/RHD and relevant steering or suspension version | 08 Packing, MOQ, quantity, lead time, and labeling requirements |
The lowest quotation is not good value if the part cannot be installed. A few minutes of confirmation before production can prevent weeks of replacement work after arrival.
Source with Fewer Surprises
Tie rod ends, rack ends, and ball joints are compact parts with a large effect on fitment, safety, and customer confidence. Successful sourcing depends on disciplined identification rather than visual similarity. Start with the OE number, add complete vehicle information, confirm the critical dimensions, and define the expected quality and packing before the order is released.
READY TO SOURCE WITH FEWER SURPRISES? Send your OE list or Excel file together with vehicle details, required quantities, product photos, and any special packaging needs. Amigo Auto Parts can help consolidate steering and suspension items from Taiwan and prepare a practical mixed-SKU sourcing proposal for importers, distributors, and wholesalers. |